
PROJECT LIFE 2014 - Coverpage & Week 1...
11:35 AM
HELLO!!!
Today I am here to show you the beginnings of my 2014 Project Life album. I am hoping this will become a weekly segment as I keep up with documenting our life each week.
I am very pleased to say that I had my cover page and week 1 spread completed a week ago but I have had some trouble photographing it - something I hope to work on and improve over the course of the year!
However, for now, please excuse the quality of these images - at least it is captured ;-)
My aim this year with my album is to keep with a double page spread per week. I think, or rather I KNOW, that my problem last year was that I tried to fit in too many photos therefore I got behind with journalling - and in the end, it still sits there with half the year undone and the first half partly completed! I have every intention of completing last years album but it will be done in dribs and drabs when I have some spare time.
Anyway...
Onto THIS years album!
Here is my coverpage...
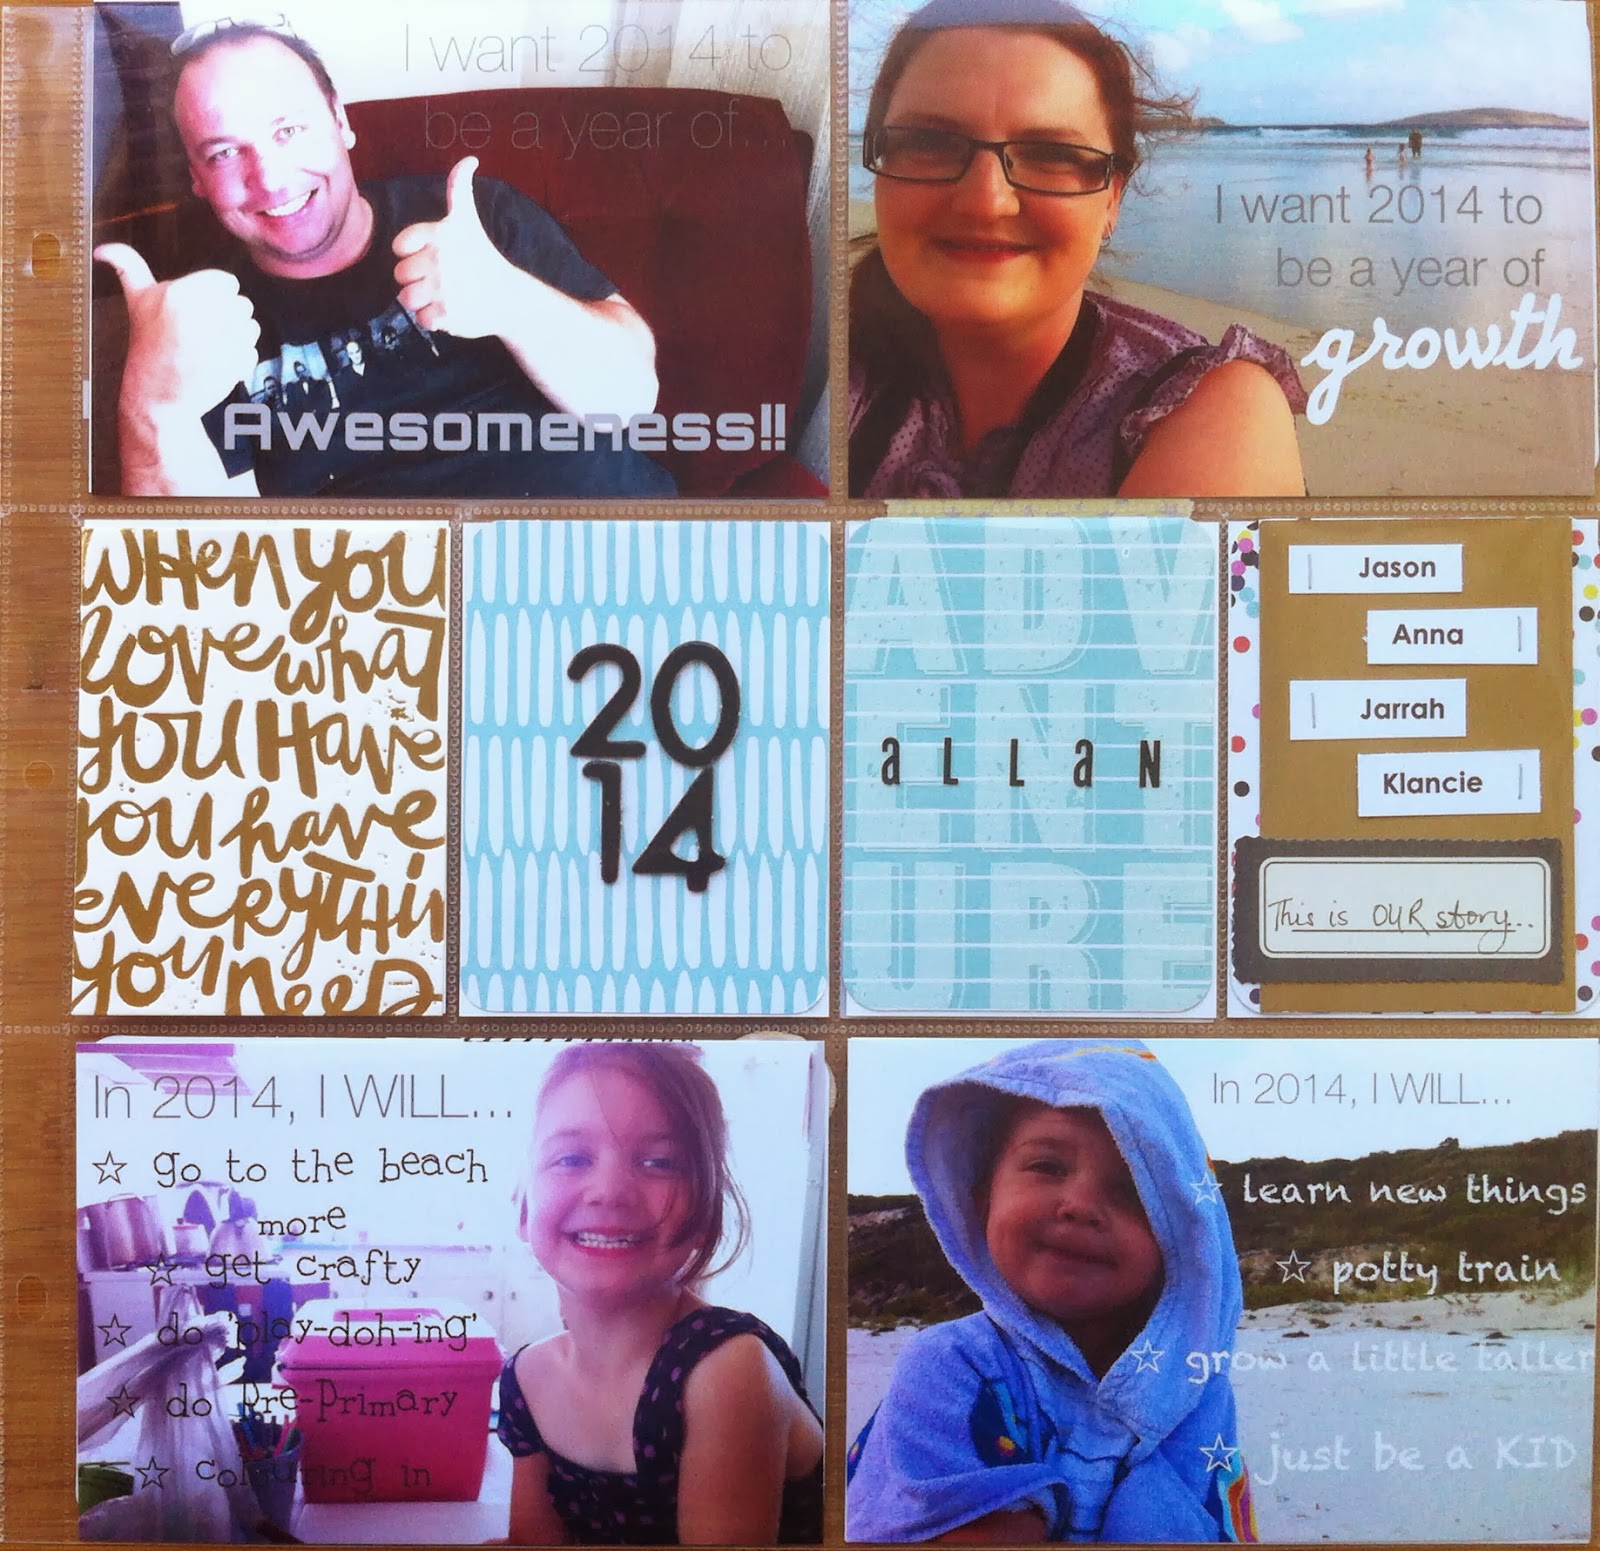
Okay, so what I have done here is that on Jan 1, I went around each member of the family and took a photo of them, deliberately positioning them to one side of the shot so I could add text to the image. I took these on my iPhone, edited in the app Camera+ (which is what I use for taking ALL my phone photos - love this app!) - and then I uploaded each image into another app called Phonto to add the text! For the Mr and me, I used the phrase 'I want 2014 to be a year of...' and we added our word. I'm quite certain that no matter what year it is, my man will always say something about being awesome or awesomeness!! Hahaha!
The girls I started with 'In 2014, I WILL...' - Miss J came up with her own goals, and I wrote Miss K's. The biggest goal being to potty train!! Aaaarrrgggh - that is a WHOLE other story!!! ;-)
I have used the pocket page type A for this, and added the photos into the 6x4" pockets.
For the 3x4" pockets, I have used a scripted word card from a past Project Life kit by Studio Calico. I subscribed to this kit at the beginning of 2013. I was going to cancel my subscription for this year BUT at this stage I am going to continue - for a little while anyhow. I do love them.
The other cards are from the Sunshine Core Kit which I am using throughout this album. I never really stick to just one kit. I always mix and match abit but I will keep coming back to this kit. It was designed by Elsie and Emma of A Beautiful Mess and it's ultra funky. Love it.
As you can see, I used some chipboard letters to create the year title on one card. The next card, I used an overlay with 'ADVENTURE' written on it (again from a previous SC PL kit) and stuck some mini black letters over it spelling our surname and popped it over the card. The third card, I cut down a gold paint swatch from Bunnings (yep, again. Love these.) and printed off our names from the computer, trimmed them up and stapled on to the gold swatch. I used a title tag from the Maggie Holmes 'Flea Market' ephemera pack (purchased from Polka Dot Creative) and wrote 'This is OUR story...' on it.
Pretty simple really but says all I wanna say to take us into the year.
Okay! Onto Week 1!
Here it is in as the double spread (again I ask, please excuse the quality of this image!)...
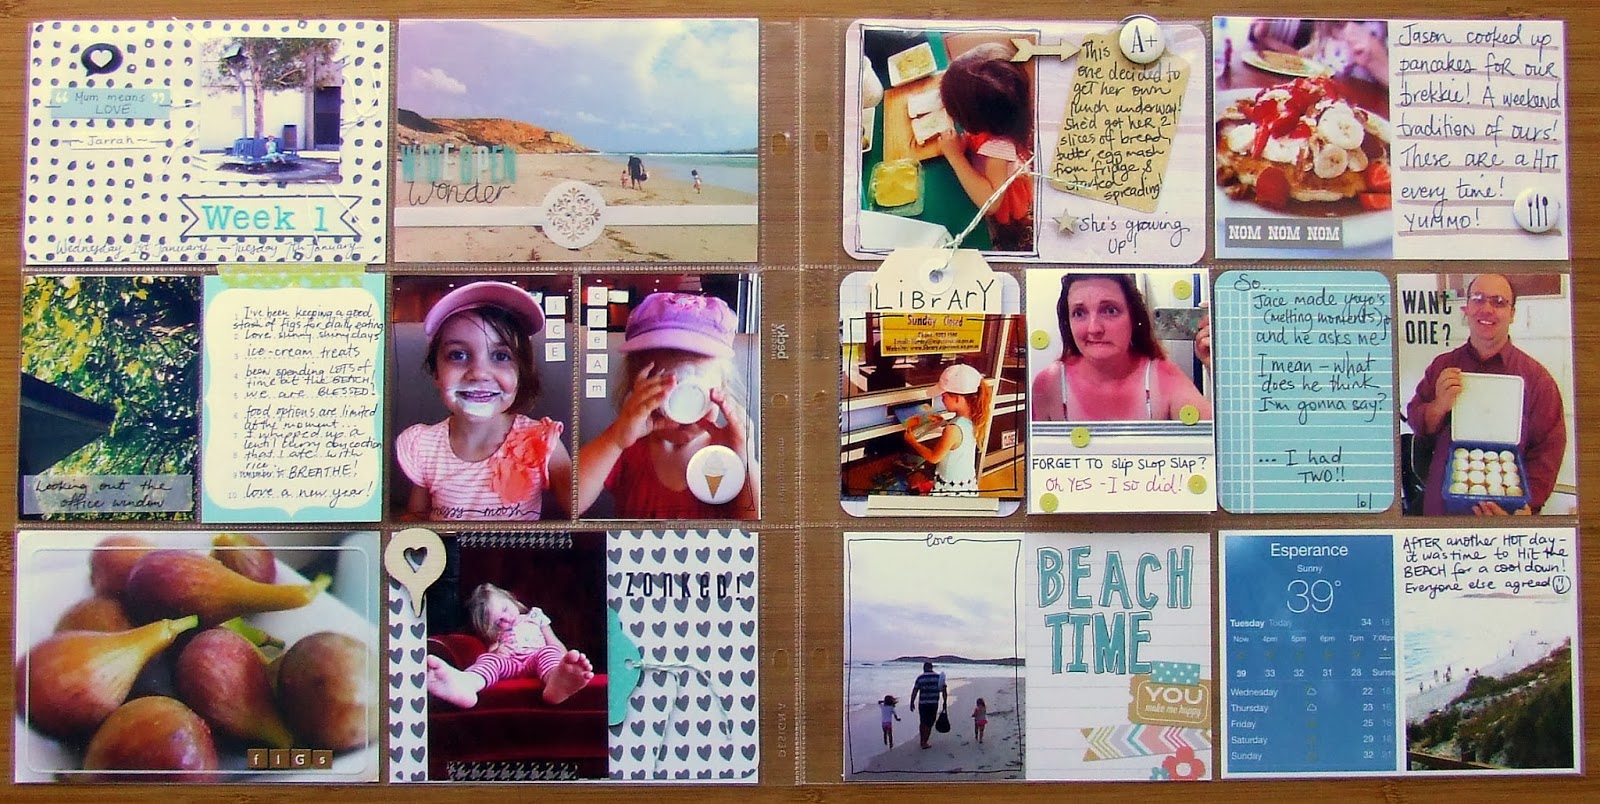
I always like to start the first pocket off with the week title. And this year, I would also like to be able to add a fave quote or phrase one of us has said throughout the week to feature on this intro card to the week. Week 1 was from Miss J - 'Mum means LOVE'. Awwww :-)


So just a little close-up and explanation about the first page.
I used some photo overlays (purchased from Craft House) on the beach and figs photos. I used stickers to create the text for the images ON the actual overlay. On the beach photo, I used a Precision pen from American Crafts to write the word 'wonder' and popped the overlay with the stickers writing 'Wide Open' on it and put them all together - love the effect. Will be using these again. I have just learnt that there is a film that can be removed from the back of the overlay which aids in higher clarity - haven't done this as yet in these photos but will be doing that in future :-)
I included all photos I wanted but didn't have much space for journalling a few thoughts from the week so I stuck on a journal card with washi tape to the page protector over a photo that didn't really suit the colouring of all the rest of the page images. You lift up the card and can see the image of a lentil dish I made up one night for dinner.
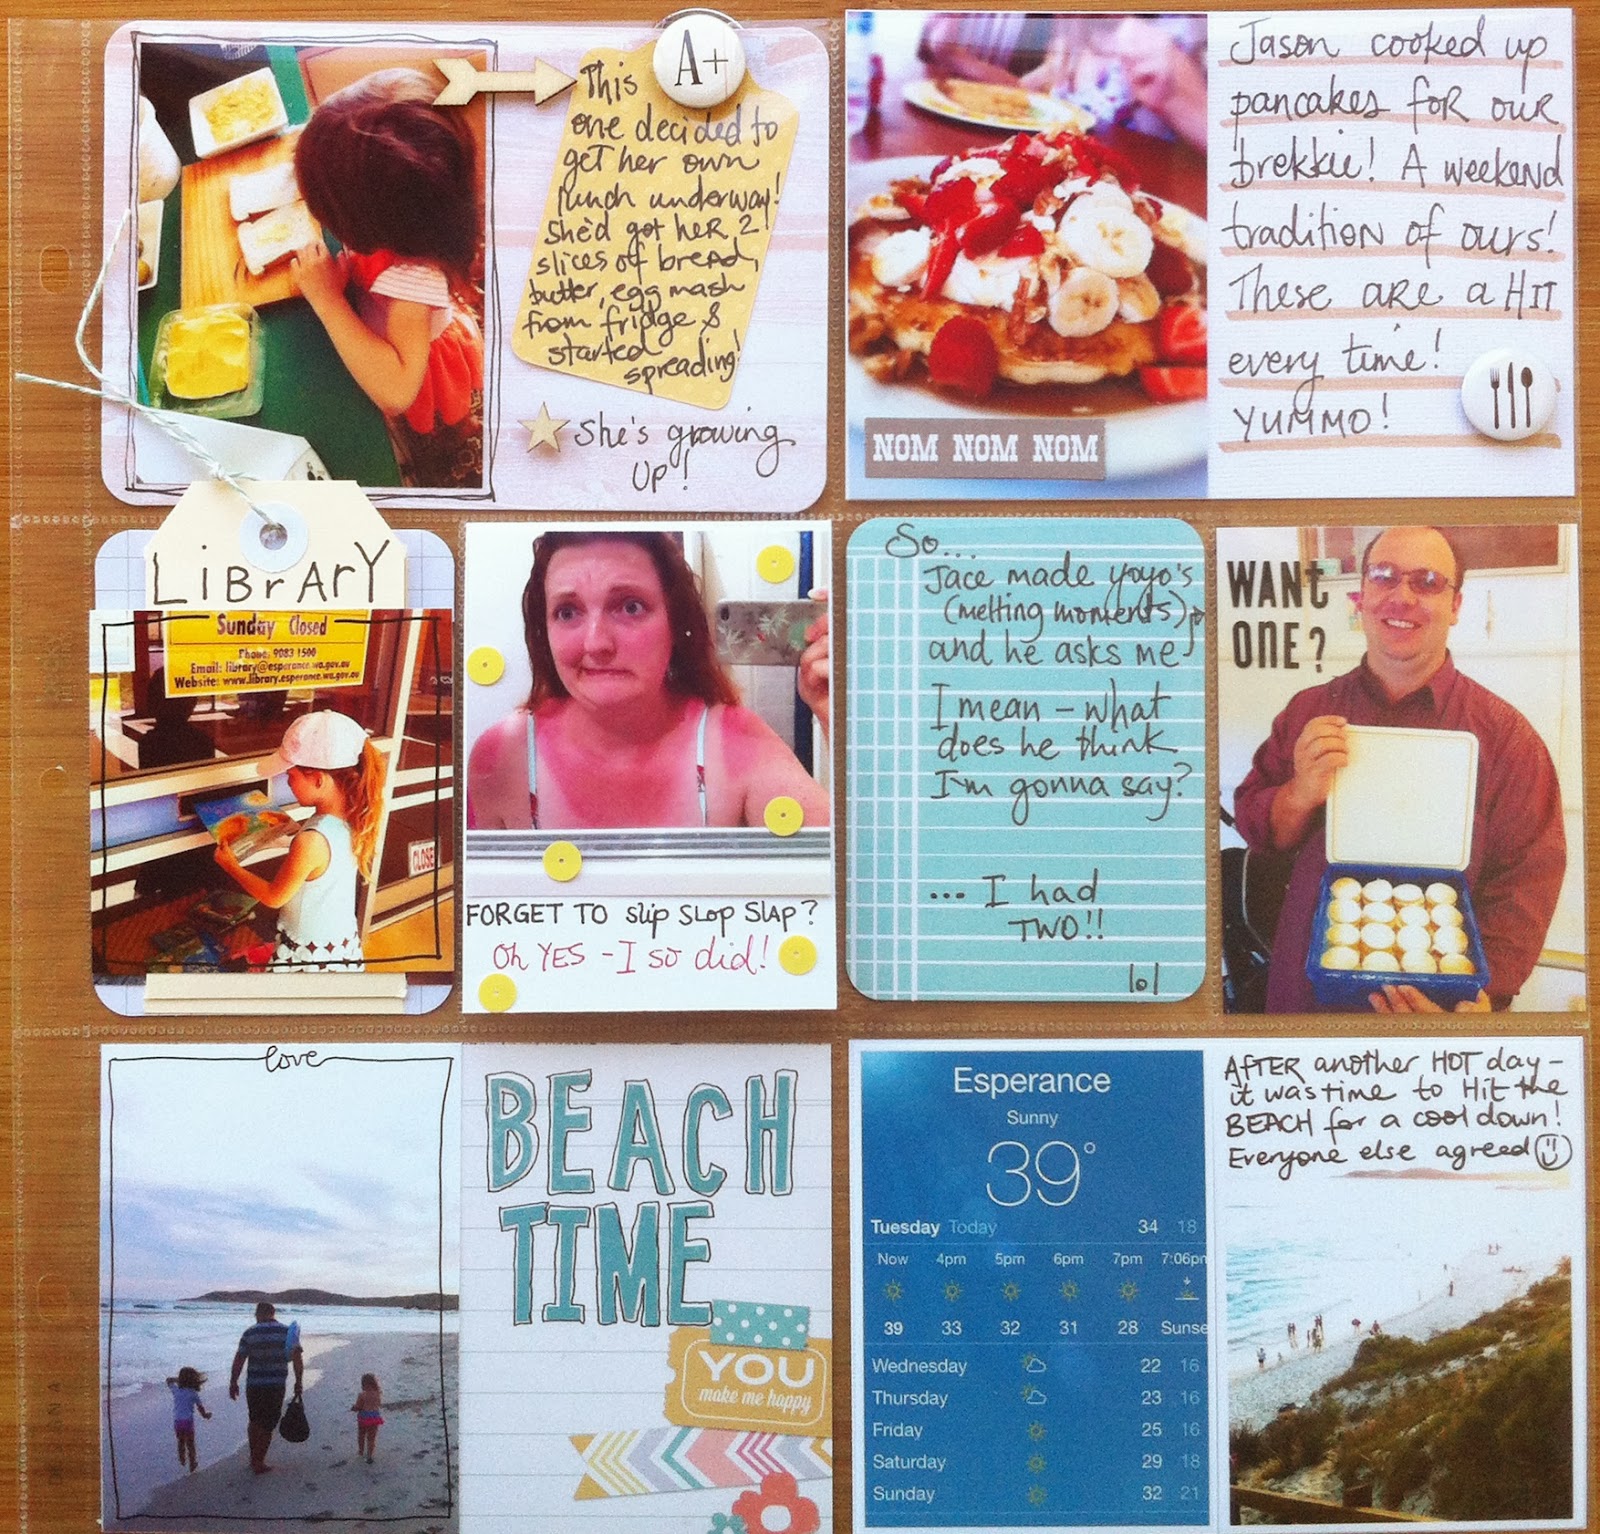


The second page included another two little flappy pockets as well. This just helps to include more photos and add more of the story. And it enables me to be able to use more of what I want to include without exceeding the double page spread ;-)
In one pocket, I used two shipping tags and tied together with twine and then added photos and journalling. I attached the bottom tag to a 3x4" grid card for stability in the pocket. The other card I cut some white cardstock to size (3x8") and scored along the 4" mark to create a 'lift-up' element to the pocket card.
JUST A LITTLE TIP: You can see that I've used some wood veneer and flair embellishments. These do add bulk to photos so what I have done is decorated the card first, popped it into the pocket and then attached the selected embellishment onto the actual page protector. This just stops the pocket from bulging and helps keep a flat look to the pocket when photographing too.
On the first page, I used an icecream flair from A Piece of Cake Designs. I also used some wood veneer from Think Spring on Etsy.
On the second page, I used a couple of mini flairs from an SC PL kit.
I have fallen in love with this style of memory-keeping all over again. I am determined to keep up with it.
I have my second week photos printed and ready to go. Must get into the studio to put it all together.
I hope to be back within the next week with my Week 2.
Thanks for popping by.
Take care.
With Sprinkles of Sunshine...
Anna
 Hi! I'm Anna...


0 comments